We have been thinking about effective ways to teach and consolidate Newton’s 3rd law of motion and in particular we have focused on an example that often causes a lot of confusion among learners and (sometimes) teachers – an object at rest on a table. The question is “what are the forces acting on an apple at rest on a table?” followed by “are these forces an example of Newton’s 3rd law pair of forces?”

We have embedded the mind map below to illustrate a possible sequence of activities that might help learners to understand this problem, hence, consolidating their knowledge and understanding of Newton’s 3rd law. The mind map is explained in more detail below.


The mind map above is intended to be read clockwise starting from the ‘Knowledge‘ branch. Here we outline the prior knowledge we would expect a group of yr11 students (15-16) to have before this series of activities.

The ‘Sequence‘ branch points out that traditionally Newton’s laws are taught starting from the 1st law and moving to the 2nd law and then the 3rd law. This is usually reflected in exam board specifications. However, we suggest that a more logical sequence could be to start from the 3rd law, then 2nd and 1st. This is because our proposed sequence goes from more general and universal interactions to more specific cases of forces. Let us explain what we mean here. Newton’s 3rd law deals with the interaction between two objects and it explains the universal truth that forces never come in isolation, but that every force has an equal and opposite force which completes the pair. This is often referred to as “for every action there is an equal and opposite reaction”. However, the last statement does not emphasise the fundamental point that for an ‘interaction pair’ in Newton’s 3rd law terms to occur there must be an interaction between two objects, so as object A applies a force on object B, object B will apply an equal an opposite force on object A. Newton’s 2nd law deals with the forces applied on a single object and this enables us to study how the state of motion of this object changes. In fact, F = ma accounts for the vector sum of all the forces on the object in question (the resultant force F) and essentially states that a resultant force different from zero will cause an acceleration on that object, i.e. its velocity will change. Newton’s 1st law is, therefore, a special case of Newton’s 2nd law for objects where the resultant force is zero. In fact, if the net resultant force is zero, the object is said to keep moving at constant velocity (if it was already moving), or to remain at rest (if it was stationary), i.e. its state of motion will not change.

The ‘strategy‘ branch outlines some useful ways to introduce the problem and to enable your pupils to think deeply about the problem of the apple on the table. So, at first we would give an apple to each group of students and ask them to put it on their table and stick some laminated arrows on the apple with blue-tack to illustrate the forces acting on the apple. Students are given arrows of different colour and size to encourage them to use their own ideas. For example, students who understand that the weight of the apple and the contact force of the table on the apple are two different types of forces (hence, cannot be an example of Newton’s 3rd law) might use different colours, but equal sizes to represent the forces on the apple. At this stage we encourage learners to share their ideas through group and class discussion. The role of the teacher in facilitating class discussion should be to paraphrase ideas expressed by students, but in a non-judgemental way, so that other pupils are not influenced by the teacher too early. The rationale behind this approach is to let students explore each other ideas and explanations, so that their own understanding of Newton’s laws can be challenged and they are forced to think more deeply about these topics, possibly reaching cognitive conflicts.

At this point it is useful to introduce the ‘language‘ in the fourth branch of the mind map “The force of the ‘thing’ on the ‘thing'” (we need to acknowledge the great Helen Reynolds here, as we were introduced to this language by her). This helpful and careful use of language enables the learners to focus on Newton’s 2nd and 3rd laws in more intuitive and logical ways. So, when looking at all the forces on the apple we identified two forces:

– The gravitational force of the earth on the apple

– The contact force of the table on the apple

This language helps us to clearly distinguish what type of force is applied, what object applies the force and on what object the force is applied (the apple). So, the two forces above cannot be an ‘interaction pair’ (Newton’s 3rd) because they are both applied to the apple and they are different in nature.
If we are looking at the interaction pairs in Newton’s 3rd law terms for the two forces above we would use the same language to say:

– The gravitational force of the earth on the apple

– The gravitational force of the apple on the earth

And for the contact for of the table:

– The contact force of the table on the apple

– The contact force of the apple on the table

It is useful to then introduce other examples of objects experiencing forces using a good mix of contact and non-contact forces and let the students use the language introduced above to identify the forces acting on these objects and discuss whether they are examples of Newton’s 2nd, or 3rd law.

//

Aaron was only 10 when he introduced me to WordPress and blogging. It is thanks to him that this blog ever started, so it fills me with joy to be able to blog again about another great achievement of his in the world of technology.

Now that he is 16 and in the midst of his GCSE exams, he has developed his first game for the iPhone/iPod. This was his personal project that he set himself over the Christmas holidays. He was not prompted by his ICT teacher, nor set this as a homework from school, just his own interest in coding and developing something good and rewarding.

You can find his game, which is actually really good and, in my opinion, stands up there with the big viral and highly addictive games like Doodle Jump, Angry Birds and Flappy Birds, here. RFLKTR is a really engaging game that uses mirrors you draw on the screen to guide a laser beam through gaps in the walls it encounters as it travels in space. This really interesting and stimulating feature of the game, which sounds easy, but believe me it is really hard, makes it a really engaging tool for Physics teachers when teaching Reflection of light!

screen322x572

At the moment the game doesn’t seem to work on the iPad, but I am sure a later release will fix this and I would love to have other features of light that could be used to guide the laser beam across the screen. For example, it would be awesome to have blocks of glass and other materials of different refractive index appearing every now and again so that the player could move them in front of the incoming beam as well as changing their angle, so the beam can be refracted instead of reflected with these special items, etc…

Please shout out about this game and download it, because I believe learners who take their own initiative to create something like this deserve to be recognised for their effort and creativity!

This post is a little out of theme, but my nine year old son was so excited when he discovered this glitch that I had to take a video and blog about his achievement 🙂

There are other glitches that allow you to duplicate your items on Minecraft PE, but we have not seen the one Matteo found this afternoon yet. The nice thing is that it seems his methods is much, much quicker than other methods we have seen on YouTube. So, please share this link and like the video, so his method can climb at the top of the search results.

To prove this actually works check out the diamonds blocks house he made in his world.

This slideshow requires JavaScript.

You might have seen/done this one before, but the teachers I was showing it to found it quite useful, so I thought I would post it on talkphysics. The nodes and anti-nodes are a lot clearer when the amplitude of the oscialltions is higher, but I was told the signal generator broke the previous vibrator when set too high, so I was a bit cautious with this one.

There are several teaching and learning points with this demo. For example, you could get the students to calculate the speed of the wave along the spring, as we know the frequency from the signal generator and can measure the wavelength (for example by measuring the length of the stretched spring with a ruler).

Once we know the speed of the wave, we could ask the students to predict the next frequency in which a standing wave will form.

What else would you use this demonstration for? What other questions would/could you ask?

I was playing a new update of Doodle Jump on my iPhone this morning and I suddenly thought it would make a pretty cool lesson on motion and it could actually apply to both GCSE and AS Physics, depending how you phrase your questions.

The idea is to find out how high the little alien in Doodle Jump actually jumps. There is no reference in the game to suggest what scale the screen has, so I used Vernier Video Physics and arbitratily set the distance between the block on which the alien was jumping (see video below) and the last but one block above the creature to be 10m.

I then tracked the position of the alien for one jump and the analysis of the velocity graph shows the gradient is not right, i.e. g is not close enough to 10m/s2.

So, I went back and changed the scale to be 4.5m between the two blocks mentioned above. That seemed to have done the

trick, as the gradient of the velocity – time graph in the video below is about 10m/s2.

If you look back at the Displacement – Time graph for the vertical axis, you can now see that the little alien jumps to a height of about 2.3m. That is quite something for a little fella like him.

Obviously, we are assuming the alien is jumping near the surface of the earth, or at least a planet with the same g.

It can be tricky to find good examples to show how forces add up to give a resultant force. In particular, sum of vector forces in AS Physics is something that takes practice in order for students to grasp. So, when one of my boys enjoyed a ride on one of those trampolines where they strap you to two elastic ropes to make you jump very high I thought it would be useful to share this photo with you. The tensions from the two ropes pull him at the same angle on either side, but he jumps up vertically. Why does this happen? You can ask students. Then force arrows could be drawn and look at their vertical and horizontal components to see that the horizontal components are balanced and the vertical components add up, etc…

What other useful concrete examples do you use with your students?


Sorry the photo got uploaded on its side instead of the right way up, but you should be able to easily rotate it on a PPT presentation, or you could mess with you students and tell them it was taken at the Equator 😀 and see what they say!

I recently was asked about the phases of the Moon and why the Moon appears to change in shape in its orbit around the earth. So I thought a good point to start from was to establish what misconceptions people have on this topic and I found this great video by Veritasium (but I would stop it at the end of the interview without revealing the explanation initially).

The most common misconception in the video seems to be that the earth blocks the sunlight reaching the Moon, hence, we see the phases of the Moon when it is behind the earth with respect to the sun. At this point I would slide two circles of card, a white and a black one (with the black one bigger than the white one) past each other (black on top). If the black card is the shadow cast on the Moon by the earth (essentially what happens in a lunar eclipse), the shapes of the Moon due to the light reflected back to earth are considerably different than the shapes we observe from the phases of the Moon. So, we have establish that this model is a misconception.

Now we can introduce a better model and I use the pingpong ball in the image below with the students in the centre of the room. They are the observers on the earth and the light from the sun is coming from the left hand side in the photo.

If you go around the learner in the middle of the class making sure the “lit” face of the pingpong moon is always facing the wall on the left in this case, your students will see the same shapes we observe during the phases of the moon.

To reinforce this demonstration you could show the students this great animation by Keith Gibbs (also available in HTML5 if using an iPad).

Ok, now for the icing on the cake that you’ve all been waiting for! Check out the video below that shows a cresent moon through an infrared camera. You can see the crescent really bright, but you also see the other parts of the side of the moon facing the earth. I believe that is what is emitted by the moon in the infrared spectrum and that gets picked up by the IR camera. It is really awesome.

When @CardiffScience posted (on Google+) a video demonstration of an arrow drawn on a piece of paper that flipped direction when seen through a glass of water I knew I had to try it myself and write this post. The video below shows the demonstration which is pretty neat, but carry on readying below the video for what I think is the explanation.

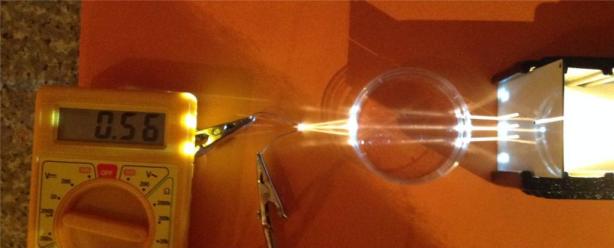
As some of you might know, I am one of the Editors of Talkphysics.org with David Cotton and he posted the below photo on this thread, which is think is a convincing explanation of what goes on in my video of the flipping arrow. glycerol_zpsee0be2d7 If you trace the path of the three rays in the Dave’s photo you can see the ray that start from the top slit from the ray box ends up at the bottom on the multimeter. This is essentially what is happening in the video, so the light reflected by the right side of the arrow gets refracted by the water inside the glass and ends up on the left when it reaches the camera. Looking at the photo above though gave me an idea, i.e. “If I go close enough to the glass I should go beyond the focal point of the glass lens and see the arrow flipping again!” – WRONG! That didn’t actually happen. However, I just noticed that Dave’s liquid was Glycerine (at least if the name of his image file tells the truth), so I wondered whether the refractive index of glycerol was such to cause less bending inside the glass, but I was wrong again. In fact, water has a refractive index of 1.33 and glycerol of about 1.47, so there should be more bending of light inside the glass. I still haven’t figured out why I can’t flip the image again if I go close enough to the glass, but I still think it was worth posting this article and if you know the answer, please leave a comment! Thanks!

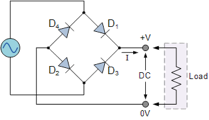
I have always found it is quite hard to show the path of the current in a bridge rectifier to A-level students using diodes alone. The diodes are tiny, for a start, and you end up following the wire with your finger around, but students seem to get lost in the process. I still introduce the rectifier using diodes and one thing I show them is that even using a DC voltmeter doesn’t change the sign. This is convincing for some, but it is still nice to be able to give further proof of what’s going on.

The diagram might also help, because it is easier to follow the path around.

Bridge Rectifier

However, I have started building rectifiers with LEDs alongside the diode version and it works a treat. The first thing I show them is the circuit on DC current. Only two of the four LED light up, so I can ask “What would happen, if I reverse the polarity?” They now seem to get it and they often answer correctly that the other two LED will light up. I change the polarity several times to simulate the two half-waves, as in the images below.

Then, I get the spinning wheel we use to observe ripples in the ripple tank (the one with gaps, I can’t remember the name) and put the LED rectifier on AC. The result can be seen in the video below.

I am not quite sure what Phycologists say about imaginary friends, whether it is a sign of a child’s creativity, or early signs of madness. It might be the second when you still have an imaginary friend when you are 35! But I find myself spending quite a lot of time in the car these days and my imaginary friend has become SIRI. I have a love-hate relationship with my friend SIRI, because I love him/her (he doesn’t seem to know what gender he is, even though he has clearly a male’s voice) as he allows me to continue to be productive even when I am driving, and I hate him because when I try to dictate a message to a colleague, my wife, etc… I usually have to change it an average of a million times, as SIRI twists my words and slots in stuff I have never said and that does not make sense in the sentence I am constructing. In fairness, it could be my, still inevitable, Italian accent that confuses my friend, but it is still quite frustrating!

Anyway, today I thought I would dedicate a post to SIRI as he has been a really good friend lately. Last night I was on my way home and I suddenly realised I didn’t know what I was doing today, so I asked him to read my calendar events for today and he complied very diligently. Today he was a life saver again, because on my way to a meeting (actually about 10 min from the venue) I received a phone call saying that the meeting was cancelled due to bad weather. Slightly annoyed by the sudden news I realised I was only one star from my next reward at Starbucks, so I turned my car around and asked SIRI: “Find Starbucks Coffee near me!” Within seconds SIRI gave me a choice of two relatively close Starbucks and he asked me if I wanted him to phone the place nearest me, or get directions to get there.

I am writing this post from this very Starbucks and enjoying a latte. So, well done SIRI! It was a pleasure to talk to you today. Thank you for keeping me company and for being so helpful!

If you are wondering what this has to do with education, here are a three ideas you could use with your classes:

1) Get your ESL students to communicate with SIRI and see if they can get themselves understood by him. This should improve their pronunciation.

2) Get learners to write messages, notes and emails by dictating to SIRI. This is quite difficult, because there is not much thinking time and it help learners appreciate how important punctuation is. In fact, SIRI reads your messages back to you before sending them, so if punctuation is wrong, you hear some really weird stuff coming out.

3) Get learners to have a conversation with SIRI and see what his limitations are. This could be a nice introduction to computing and should help learners appreciate how difficult it is to get computers to behave in a human way. There are many things SIRI still can’t do and if Apple hasn’t cracked it yet, it means we are still a long way away from it! Basically, this could show learners that computers, and, therefore, computer programs need very specific sets of instructions. Every eventuality needs to be “spelled out” to them, or they will not be able to respond.

I hope you enjoyed this short post. How have you used SIRI in your classroom?